
The first three examples were originally used to evaluate the accuracy of using equirectangular images as a ‘photographic theodolite’ but provided useful data for trying out PaMe.
The fourth example shows a setup used to evaluate PaMe with a selection of cameras and lenses with targets positioned to explore different possibilities.
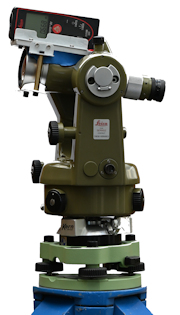
 The ‘points’ were circular targets which were measured relative to the 360° Panorama locations using a Kern DKM2-A 1″ Theodolite and Leica DISTO.
The target was developed in the early 1980s for close range photogrammetry to be easily intersected by both ‘theodolite cross hairs’ and the ‘floating mark’ in a stereo plotter, irrespective of distance and angle to the line of sight (within reason). The colour was chosen so that the ‘theodolite cross hairs’ are clearly visible against the target which appears as black and white with the monochrome film used helping with identification in the image.
To ensure stability ‘survey tripods’ were used and to ensure the 360° Panoramas were concentric with the theodolite Leica (Wild) tribrachs provided ‘forced centering’.
For Setup One, Setup Two and Setup Three the images were captured with a DX DSLR + 8 mm Fisheye lens yielding 12,000 x 6,000 equirectangulars. For Setup One and Setup Two measurements were also taken from equirectangulars resized to 6,000 x 3,000 to simulate the images produced by single shot duel lens cameras, but Setup Four uses two single shot duel lens cameras.
The results show no significant difference between using the 72 Mp (12,000 x 6,000) equirectangular images and the 18 Mp (6,000 x 3,000) equirectangular images although working with the higher definition image it was easier to identify and intersect the points being measured between.
The ideal is for the points defining the measurements to be in the proximity of the baseline defined by the two panoramas, with a good ‘angle of cut’, but not along the axis of the baseline, so cognisance should be given to the ‘geometry’..
If you already have the equipment to capture 360° Panoramas (e.g. a dual lens camera) it is a straight forward process to asses if it is suitable for your application:
Take two 360° Panoramas in the same horizontal plane with measurable objects in the locations you want (e.g. boxes, lengths of wood, marked items such as Ranging Poles);
Measure the distance between the two Panoramas or a known length (preferably similar to the distance between the Panoramas) or both;
Take off measurements with PaMe Light which can be purchased for the nominal fee of €8 for 100 measurements, which is more than enough to evaluate the technique.
 |
Setup One Photography – June 2016 Nikon FX DSLR + Samyang 8 mm Fisheye Lens 16 Points co-ordinated with the Kern 1″ Theodolite and Leica DISTO on two vertical surfaces parallel to the ‘base line’ between the two 360° Panoramas. Protocol – “Known distance between pano’s” and “Known length”. |
|
 |
Setup Two Photography – October 2016 Nikon FX DSLR + Samyang 8 mm Fisheye Lens Five Points co-ordinated with the Kern 1″ Theodolite and Leica DISTO plus two Directly Measured Lines. Protocol – “Known distance between pano’s” and “Known length”. |
|
 |
Setup Three Photography – 4th September 2017 Nikon FX DSLR + Samyang 8 mm Fisheye Lens 12 Points co-ordinated with the Kern 1″ Theodolite and Leica DISTO on two vertical surfaces parallel to the ‘base line’ between the two 360° Panoramas. Protocol – “Known distance between pano’s” and “Known length”. |
|
 |
Setup Four Photography – April 2021 Selection of cameras and lenses 17 Co-ordinated Points [T1 to T17] positioned to explore the possibilities with PaMe. Protocols – “Known distance between pano’s” and “Known length”. |
![]()