
Panoramas are straightforward to create from images from just about any camera, with the help of low cost software.
This page is intended to encourage you to create your own Panoramas.
There is a lot of information about creating panoramas on the Internet, but there is also disinformation. Many cameras today offer panorama functionality and the photographic magazines have articles on the subject from time to time. I have found a lot of the information to be academic and confusing and tended to learn how to create these images by experiment and share some of my experiences here.
I find creating panoramas rewarding and feel that they often convey the feeling for a location much better than a collection of single images, but anyone setting out to create panoramas for the first time will have questions that they want answered, such as:
What camera and lenses should I use?
What spacing (overlap) should I have for my images and in what order should I take them?
What is the Nodal Point of the Lens and do I need to take any notice of it?
Do I have to keep the camera level or can I tilt it to get all the subject included?
What exposure settings should I use?
…so I have attempted to answer these questions in the following text.
Just about any camera and lens can be used for taking images to use to create a panorama. There are many websites that offer reviews of cameras and lens. If film is used, then the photographs will need to be digitised to use with the software you chose. As with all photography, the higher resolution of the image, the better will be the result, but remember that you will be combining these images to create a new one, so large individual images to start with will create a very large panoramic image. The focal length of the lens should allow you to capture the top and bottom elements of the scene, keeping the camera horizontal, but more about this further on. If you do not have a lens ‘short’ enough to include all that you wish then greater coverage can be achieved by turning the camera through 90° and shooting in portrait mode.
Shooting digitally I tend to take my images with a 50% overlap for simplicity. If I am using film I would reduce this to 30%, or even 25%, to reduce costs, but the 50% is probably a throw back to photogrammetry where we use a 60% overlap so that there is a 10% overlap between every other image. I find the easiest way to get my 50% overlap is to take my first photograph, starting at the left, and note the detail at the centre, then rotate the camera clockwise until this detail is on the left frame and take my next photograph, repeating the process until I reach the right hand end. This technique allows me to use whatever lens or focal length that bests suits my subject. Using detail in the image to control your overlap in this way means that you don’t have to worry about working out what angle the camera needs to be rotated by or resorting to ‘click stop’ devices. Most software packages for creating panoramas will allow you to reorder the images or reverse their order, but to keep life simple it is best to shot from left to right (clockwise) as this is how most packages will automatically sort the images. However, if you take a great shot then decide that additional picture to the left and right will make a great panorama, don’t let the order stop you. If the software will not let you change the order, it is a simple matter to rename the images so that they load from left to right.
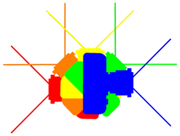
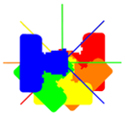 The Nodal Point of the lens, or more correctly, the Front Nodal Point or Entrance Pupil, is the point from which the cone of rays entering your camera lens converge. Technically, the rays entering the camera from the same points of detail in successive images should follow exactly the same path so the camera should be rotated around this point. The left image shows the camera rotated around the tripod bush and the right image shows the camera rotated about the Nodal Point so the rays from each shot are coincident. If you are creating a panorama with detail very close to the camera, then you will need to do this, but the reality is that if you are creating panoramas where the subject is hundreds of metres from the camera, then a few millimetres in where the camera is rotated is not going to make any difference. It is a matter of scale. This is demonstrated in the following example.
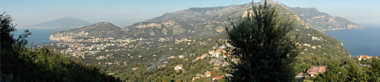
Whilst driving across the Sorrento Peninsula I though it would be good to have a coast to coast panorama and stopped at a suitable lay-by. I stood at the road side and rotated the camera around my body, which meant that the camera was rotated some 0.3 metres behind the Nodal Point. Even though the tree in the middle is relatively very close to the camera, the software I used, PanoramaStudio, was able to ‘stitch’ the images without any difficulty. I then decided that the tree might be annoying in the final panorama, so I walked some metres along the road to take another set of images for the right end of the panorama whilst keeping the images taken to the left, and the software has coped admirably. The great thing about digital photography is you can experiment without having to thinking about the cost.
|
|
|

Some software packages will cope with tilted camera shots, but some will not be able to handle the change in perspective if you tilt the camera up or down, so I try and take my photographs with the camera level and select the focal length of the lens that gives me the coverage I need, rotating the camera through 90° into ‘portrait’ mode if necessary, although if using film I tend to prefer using the camera in ‘landscape’ mode as less images are required. Unwanted sky or foreground can be cropped later. The technique of rotating the camera horizontally using detail in the image gives the freedom to select the lens that best suits the subject.
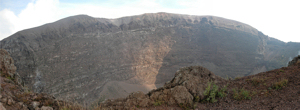 To get the crater of Vesuvius I used a very short focal length lens (10 mm where the 35 mm equivalent = 15 mm) and took three photographs, but to record the frieze of flamingos on Lake Natron, which we could not get very close to, I used a very long focal length lens (47 mm where the 35 mm equivalent = 210 mm ) with 17 photographs, and still cropped the top and bottom. By keeping the camera level, and ensuring you have coverage before taking the photographs, you will avoid changing the tilt of the camera between exposures and also avoid having to crop detail that you wished to include.

Some advice suggests that the exposure settings should be determined for the first image, or the central image, and all images made with this setting, but I find that I get a better result by taking each image with the ‘correct’ exposure. With the 50% overlap PanoramaStudio manages to provide a ‘smooth’ result. It stands to reason that the exposure values will change as you rotate the camera relative to the light source (sun) so keeping the exposure ‘locked’ will result in darker and lighter areas in the final panorama. By taking each image with the exposure determined for that image, the final panorama is more evenly illuminated. If you are shooting with a digital camera (i.e. no film and processing costs) why not try both and see which you prefer.
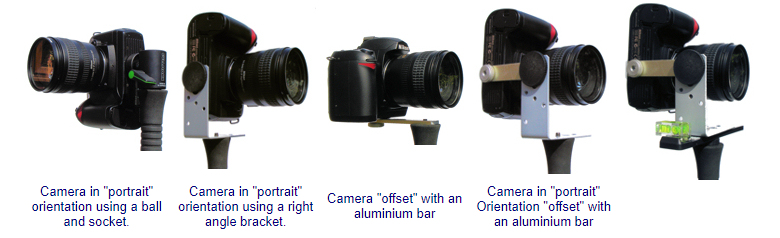
 So, the usual advice is to always use a tripod with a panorama head, which could cost you more than the camera itself. If you are trekking in some remote part of the world, or walking the moors, you might consider other priorities for the space and weight, such as a Thuraya or Epurb, or maybe just some food supplies. If you use a walking pole, or poles, consider getting one with a ¼” thread in the handle and using it as a monopod. A braced monopod can be as steady as using a tripod. If you need a method of supporting the camera in ‘portrait’ mode a right angled bracket can be purchased from your local hardware store for very little cost, and tapped in the appropriate places with a ¼” Whitworth thread, and if you feel that you really should rotate the camera around the Nodal Point, an aluminium bar, tapped in the appropriate places with a ¼” Whitworth thread, will offset the camera. Once you have become “hooked” on taking panoramas you can invest in a panoramic head such as a Nodal Ninja or Panosaurus.
![]()
The bottom line is that all you really need in the field is a camera
 |
Some Useful Links Links to Panorama Related Sites and Software |
||